

Using gh
GitHub's new command line interface
Command line tools Tutorial
The GitHub CLI, invoked with $ gh is the official command line interface of the popular code repository website, GitHub, making it possible to create repositories and even search available issues without a web browser! Before the release of the offical CLI many avid coders used the open-source, community developed, hub command. As the syntax is similar, switching to gh for those already familiar with the hub command should be simple. This article, however, assumes no such familiarity. Let's address the basics: Installation, authenticating, configuration, and creating a remote repository.
- Installation
- Authenticating
- Using aliases
- Configuration
- Creating a remote repository
Installation
Linux
Building from source
While there are often easier methodologies for installing software on your machine there will always be niche circumstances which require or (enthusiasts which desire) to do things "the Unix way". To build GitHub's command line tool you're going to need a golang compiler.
First, let's check if you already have go installed, gh requires version 1.13 or higher
$ go version
If you don't already have go installed, the installation instructions can be found here at https://golang.org/doc/install Once that's sorted out:
Clone the official repository for ghBuild with make$ git clone https://github.com/cli/cli.git gh-cli$ cd gh-cli
$ make
Finally, move the bin/gh executable to your PATH
to enable simple calling of the executable name and not it's complete address in your filesystem
$ sudo mv ./bin/gh /usr/local/bin
Let's verify our success with:
$ gh version
Debian/Ubuntu
Step 1: Key exchange
$ sudo apt-key adv --keyserver keyserver.ubuntu.com --recv-key C99B11DEB97541F0
Or if behind a firewall:
$ sudo apt-key adv --keyserver hkp://keyserver.ubuntu.com:80 --recv-key C99B11DEB97541F0
If you don't have the dirmngr package installed, you may recieve the error gpg: failed to start the dirmngr'/usr/bin/dirmngr/': No such file of directory To remedy this simply install the missing package and repeat step 1
$ sudo apt install dirmngr
Step 2: Add the repository
$ sudo apt-add-repository https://cli.github.com/packages
If you don't have apt-add-repository your package manager should provide it readily, before repeating step 2, run:
$ sudo apt install software-properties-common
Step 3: Update the repository and install
$ sudo apt update
$ sudo apt install gh
Fedora CentOS and Red Hat
$ sudo dnf config-manager --add-repo https://cli.github.com/packages/rpm/gh-cli.repo
$ sudo dnf install gh
SUSE/openSUSE
$ sudo zypper addrepo https://cli.github.com/packages/rpm/gh-cli.repo
$ sudo zypper ref
$ sudo zypper install gh
There are community repositories not officially supported by Github for:
Arch Linux
$ sudo pacman -S github-cli
Android, using Termux
$ pkg install gh
Kiss Linux
$ kiss b github-cli
$ kiss i github-cli
Nix
$ nix-env -iA nicos.gitAndTools.gh
Microsoft Windows
Git hub provides a signed MSI installer for 64bit Windows
https://github.com/cli/cli/releases/download/v1.2.0/gh_1.2.0_windows_amd64.msiAt time of writing, the latest version is 1.2.0 to find the latest release go to
https://github.com/cli/cli/releases/latest
Macintosh
gh for MacOS can be installed via Homebrew
brew install gh
or via MacPorts
sudo port install gh
Authenticating
Logging In
In order to make use of the github command line tool you'll need to login to your github account (sadly we can not make a github account using gh-cli, if you don't have one, go to https://github.com/join) logging in is very easy,
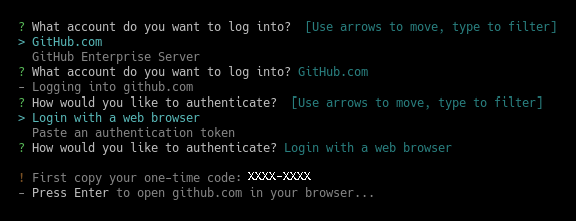
$ gh auth login
in the terminal, opens the interactive login prompt. From there you can use arrow keys to select either GitHub.com or GitHub Enterprise server and press enter to confirm your selection.
If you choose GitHub Enterprise server you'll simply be prompted with the extra step of entering a GHE hostnameNext, Log in with a web browser or paste an authentication token When you choose to log in with a web-browser a one time 8 digit code will appear in your terminal, copy that and proceed, as prompted, to open your web-browser.
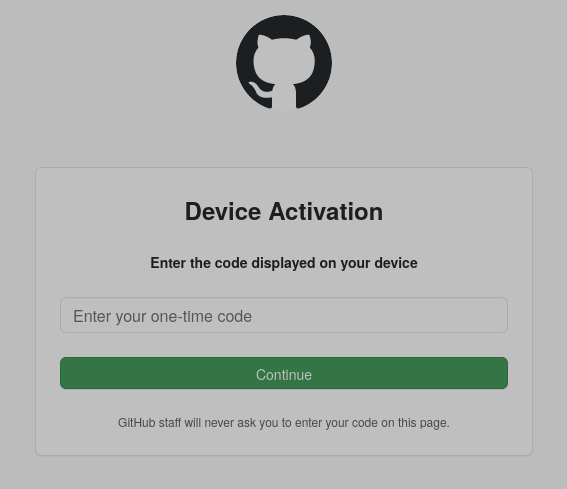
The terminal will open your system's default for you and navigate to the page. Assuming that you're allready logged in to github in your browser, you'll be presented with a page to enter the one time code that we've copied. Type it in or paste it now to continue.
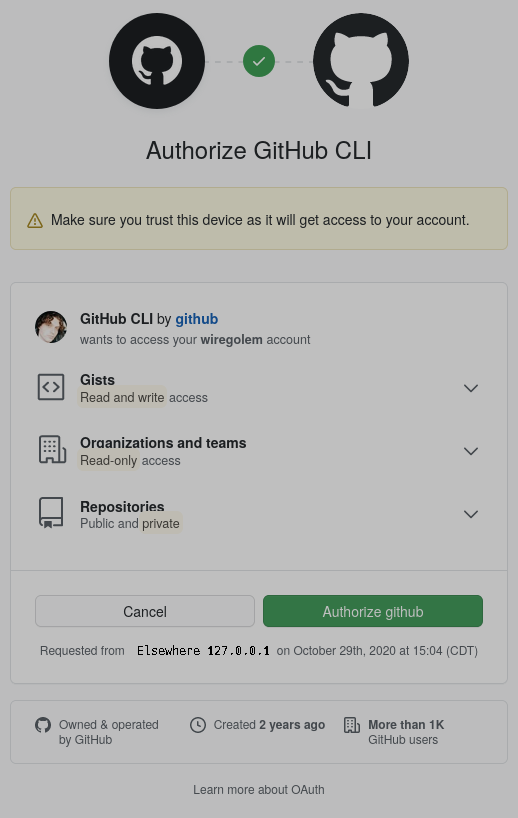
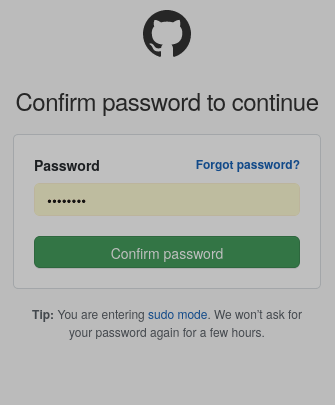
If you've entered the right code you'll be asked if you'd like this device to have permission to access your account, confirm this, enter your password, and be congratulated! Your device is now connected.
Feel free to close the browser and let's turn our attention back to the terminal. It should now display "Authentication complete. Press Enter to continue..."
You'll be asked to configure your default git protocol, HTTPS or SSH. You can change this later, I've simply chosen HTTPS. The interactive process even displays the command that it uses to accomplish this.

Logging In With A Token
Git hub makes it really easy to create an access token. Unfortunately we have to open a web browser again head to:
https://github.com/settings/tokensand select Generate a personal access token, or just click on this:
https://github.com/settings/tokens/newWhen generating a personal access token, you'll need to select some permissions, what will the login that uses this token be allowed to do through the github cli? GitHub calls these permissions "scopes". The minimum required scopes are "repo" Which grants full control of private repositories, and "read:org" read organization and team membership, as well as read organization projects. Choose the amount of permission at your own discression and excersize caution when making this selection. I'll personally be throwing caution to the wind and giving full control to the api by checking off everything in bold. You can leave a note at the top, as this access token may be one of many saved on your github account. Your future self will appreciate a self-descriptive note, but feel free to make something up.
When you've written your descriptive note and made your selection of scopes, choosing at minimum "repo" and "read:org" select generate token. Copy the token to the clipboard. There are two neat things we can do with it. We can either, paste it in the terminal durring the interactive login when choosing "Paste an authentication token" OR we can save it in a text file!
Open your favorite text editor, I use nano from the terminal for ease of use and lack of vim skills, but use what ever you'd like, paste in your authentication token and save the file with whichever name you like.
okay here's the fun partnow we can log in with the token file we've just created!
$ gh auth login --with-token < mytoken.txt
where mytoken.txt is the path and name of whatever you may have named the file containing your token press enter and ....
Nothing appears to happen.EXCELLENT! We have successfully logged in with a token! Don't worry, it only barks if an error occurs.
You can confirm this by trying to log out and seeing your username displayed in the prompt(and pressing n when prompted to stay logged in)
Logging out
This couldn't be simpler! (unless you didn't have to type auth)
gh auth logout
Your intentions will be questioned by a prompt which will display your username, press Y to logout or n to stay logged in.
... can it be simpler?YES! With aliases we can create whatever command we'd like
Using aliases to create custom commands
Aliases are a powerful feature of gh. I say they're powerful because we're lazy. They allow us to create customized short-form commands from complex expressions. This saves us fractions of a second everytime we need to get something done. After thirty or so years of typing away at the keyboard, we'll have saved enough time to slack off for few more minutes. Every moment is precious! Let's start with shaving off some of the logout command, three words is too many.
$ gh alias set logout 'auth logout'- Adding alias for logout: auth logout
- Added alias.
Now try
$ gh logout
SUCCESS!
You can be an over achiever and create "gh bye" or "gh lo" whatever you'd like, but the point is we can use aliases to create shortcuts for any commands we'd like and the syntax is simple
$ gh alias set OurNewCommand 'the complex expression we'd like to set an alias for not including gh itself'
and yes, the single quotes are important. For more info try typing this into the terminal
$ gh help set alias
Configuration
We can configure a number of things. Remember earlier when we logged in and set our protocol to https via the interactive prompt? We can change that whenever we like with the command:
$ gh config set git_protocol ssh
or
$ gh config set git_protocol https
How to use SSH to connect to github is outside of the scope of this tutorial, but github docs to a great job here:
https://docs.github.com/en/free-pro-team@latest/github/authenticating-to-github/connecting-to-github-with-sshYou can even configure the default editor that gh will open If you choose not to, gh will first try the values of your terminals environment variables in this order:
GIT_EDITOR
VISUAL
EDITOR
However, you can bypass all of these by simply using the command:
$ gh config set editor vim
Replace vim with nano or kate or geany et cetera, which ever editor you prefer.
At time of writing you may configure the following elements:
git_protocol: the protocol for git clone and push operations [https or ssh]
editor: the text editor to open when needed
prompt: a toggle of the interactive prompts [enabled or disabled]
pager: the terminal pager program to send standard output to
To set any element to the value of your choosing, type:
$ gh config set ELEMENT VALUE
Similarly to retrieve the current set value for any of the above elements, type:
$ gh config get ELEMENT
If nothing displays then nothing has been set by the user
Creating a remote repository
Okay so now you've installed gh, you've logged in to your GitHub account or your enterprise server, you've configured it, maybe you've even set up an alias or two. Great. What else is there to do?
Let's actually use gh.The reason we've installed gh in the firstplace is because it can do the things that git can't do. it can't interact with, manage, nor create pull requests, it can't work with gists, and most importantly, GIT CAN'T CREATE OR FORK A REPOSITORY ON YOUR ACCOUNT
So let's do that one.
$ gh repo create
That's it. But what did that do?
Well, with no arguments, assuming you're in a git initialized directory (ie - "git init"), gh's repo create command creates a repository on your github account with the same name as the current working repository directory
For instance:
$ mkdir my-project
$ cd my-project
$ git init$ gh repo create
- Makes a directory called my-project if one doesn't allready exist
- Changes your current working directory to the new one you've just created
- Initializes a local git repository in our current directory
- and Creates a git repository at user/my-project on GitHub
In fact, the output looks like this
✓ Created repository user/my-project on GitHub
✓ Added remote https://github.com/user/my-project.git
That's it you've created a repository!
The gh repo create command can also optionally take as an argument a name for the new remote repository ignoring the current working directory name.
$ gh repo create my-new-repo-name
or if you are part of an organization on GitHub
$ gh repo create organization-name/my-new-repo-name
will create a repo called "my-new-repo-name" for the organization "organization-name"
Optionally there are a number of flags you can set, the following comes from the output of the "gh repo create --help" command
-y, --confirm Confirm the submission directly
-d, --description string Description of repository
--enable-issues Enable issues in the new repository (default true)
--enable-wiki Enable wiki in the new repository (default true)
-h, --homepage string Repository home page URL
--internal Make the new repository internal
--private Make the new repository private
--public Make the new repository public
-t, --team string The name of the organization team to be granted access
-p, --template string Make the new repository based on a template repository
For example,
$ gh repo create org-name/my-repo -d 'An example repository' --enable-issues=false
will create a repo called my-repo for the org-name organization with the description "An example repository" with issues disabled.
To view a repository simple use:
$ gh repo view owner/repo
By default this command will open display repository's main(or master) branch in the terminal This can be changed with the --web or -w flag, to open the repository in a web browser and/or the --branch or -b flag, followed the the branch name to open a specific branch.
Without any arguments, the command,
$ gh repo view
will display the repository of your current git-initialized working directory.
There is so much more that gh can do. You can fork and clone repos, manage pull requests, handle issues, manage releases, work with gists, and make authenticated GitHub API requests. These commands are beyond the scope of this elementary tutorial. However, information regarding that functionality can be found in the official GitHub cli manual at https://cli.github.com/manual/gh_api
You've learned how to get setup and start using GitHub's new command line tool! Now you never need to leave your terminal, as the good lord intended. If you've like what you've read sign up to the std::cout << mailing list or subscribe to the rss feed to for updates on new articles the moment they arrive. If you've found what you've read to be invaluable and would like to recieve more content like this subscribe to my patreon or pour me a cup of tea.

Thank you for reading!
EOF